Understanding what lies behind a motion system is not easy. G-forces, coordinates, axes, degrees of freedom… these are just the preface to a very unique and somewhat “boring” introduction that plunges us into the intricacies and fundamentals of how any motion system works. However, this technical approach is essential, not only for building a motion system tailored to our needs but also for any virtual driver who wants to perfectly configure their motion software, adapting every piece of data and information from their simulation game to their hardware environment.
I find it undoubtedly interesting to discuss the most essential aspects of motion simulators, which, due to the breadth of content, I have decided to split into three independent articles. I will try to be as engaging and clear as possible, referencing previously published motion articles to best understand all the implications this entails.
- First, we need to understand the real forces and movements involved in any moving vehicle; this is the first part of the article.
- Second, we must represent the aforementioned forces in a set of spatial coordinates to understand how to adapt them to our simulator, using coordinate axes to position each of these movements. We will cover this in the second part of the article.
- Finally, we will see the direct application of these axes depending on the type of simulator or actuator used and, as we will discover, the same motion effects can be achieved with 2-axis systems as with 6-axis systems, each with its differences and peculiarities.
Forces in a Car
To achieve the most realistic motion possible in our simulator, it is first necessary to understand the forces that define a car and its movement. In a real moving car, G-forces come into play, which is the measure we use to gauge acceleration based on the increase or decrease in an object’s (car’s) speed.
Types of G-Forces
G-forces are subdivided based on the axis they act upon; the + sign refers to the object’s acceleration, and the – sign refers to deceleration. To keep this brief, I will simply list them:
- Gz+ / Gz- (Positive / Negative Vertical Forces): When there’s a bump or uneven surface.
- Gx+ / Gx- (Positive / Negative Longitudinal Forces): When we accelerate or brake.
- Gy+ / Gy- (Positive / Negative Lateral Forces): When we turn left or right.
Compensatory Forces
These result from the combination of several of the aforementioned G-forces applied along a trajectory:
CENTRIPETAL FORCE: This is the force acting on an object with a curved trajectory, keeping it balanced at the center of the curve and preventing it from veering off the path.
CENTRIFUGAL FORCE: This is a fictitious force that plays the opposite role to centripetal force, where the moving object tries to escape the center of the curve, meaning it attempts to move away from the axis of rotation.
As we will see later, compensatory forces give rise to oversteer, understeer, and loss of traction.
How Does the Driver Feel These Forces?
Based on the G-forces and compensatory forces generated by the moving vehicle, we, inside the vehicle, can distinguish and perceive a series of forces known as load transfers. In other words: G-Forces and Compensatory Forces = Load Transfers (driver’s sensations).
Load Transfers
An object (car) with a certain mass (weight) will undergo a series of changes depending on how the driver alters the vehicle’s speed and trajectory. These load transfers are directly perceived by the driver in the cockpit and form the basis of all the sensations their body experiences inside the vehicle—sensations we will later try to emulate with our motion simulator. But first, let’s see what they are:
NEUTRAL FORCE: The car maintains a constant speed on a flat surface with no inclines or changes. In a conventional simulator, we couldn’t emulate this movement, as it would essentially be like standing still, and the G-force we feel while moving in a real car couldn’t be felt in the simulator.
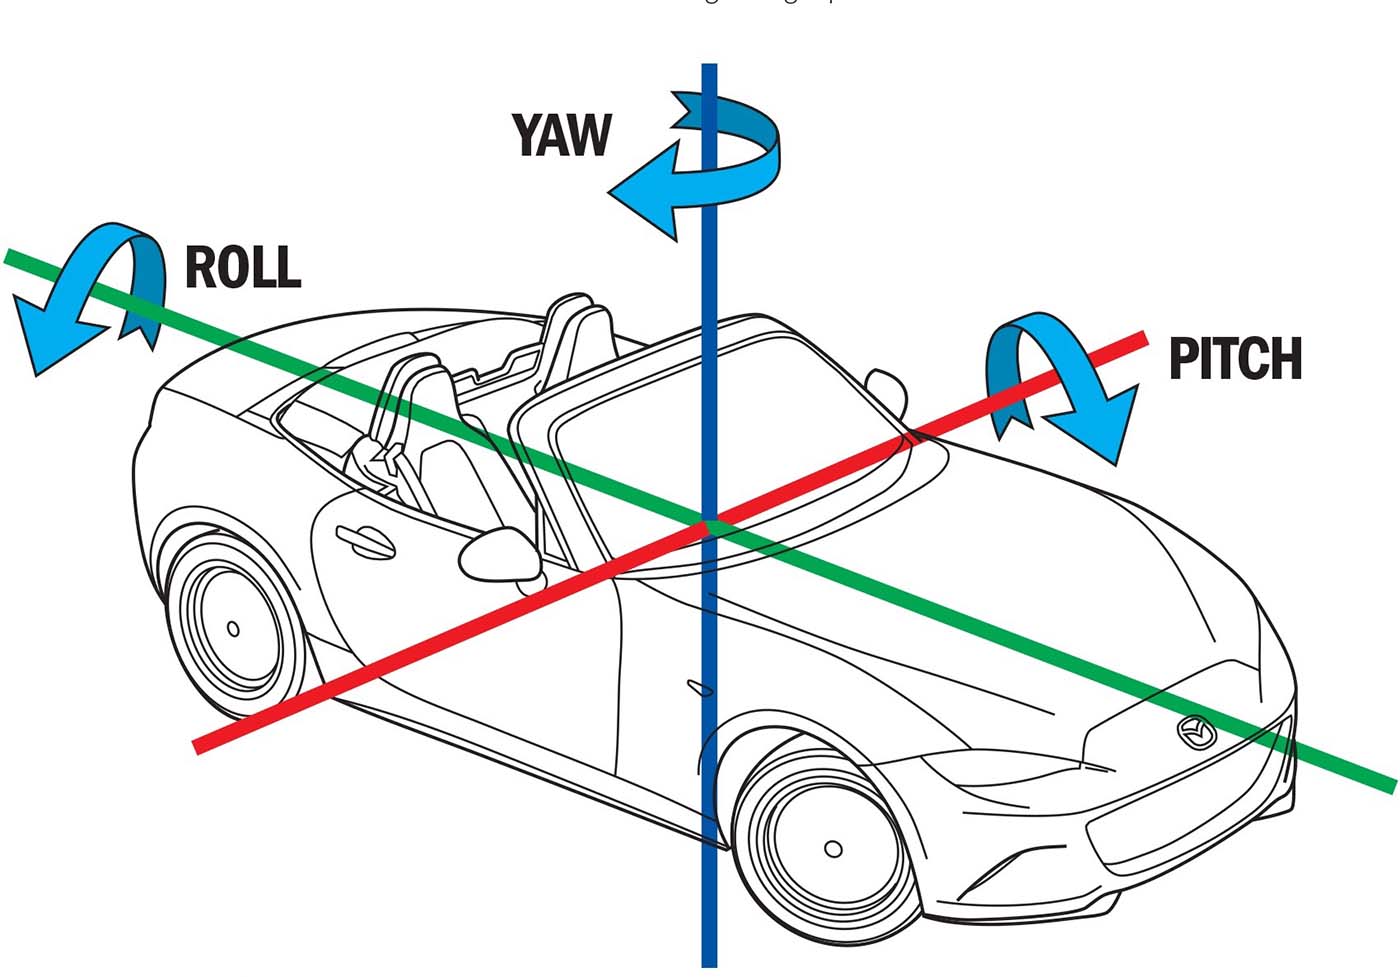
LONGITUDINAL LOAD (Gx+ / Gx-): This is the force we feel when accelerating or braking in a vehicle. During acceleration, we notice our head and back pressing against the seatback, and during sudden deceleration after braking, we feel our body lifting off the seat and pressing our chest against the seatbelt. In a simulator, we could emulate this effect with the Pitch axis.
LATERAL LOAD (Gy+ / Gy-): This is the force we feel when the vehicle moves along the transverse axis during a turn, causing our body to lean toward the same side as the curve we are taking. In a simulator, we could emulate this effect with the Roll axis.
VERTICAL LOAD (Gz+ / Gz-): This force occurs during sudden changes in elevation (ups and downs). We notice that during a sharp climb, our body tends to sink downward, compressing the seat base, and during a sharp drop, our body tends to lift off the seat base. In a simulator, we could emulate this effect with the Heave axis.
Understeer, Oversteer, and Loss of Traction (Compensatory Forces)
This is the result of combining load transfers applied together to a vehicle, which can alter its trajectory based on various factors (driver control, wind, road layout, etc.). Thus, in understeer, the front axle loses grip; in oversteer, the rear axle tends to slide almost like a spin while the front axle follows the logical trajectory; and in loss of traction, excessive oversteer causes a major spin, rotating the vehicle around its center of gravity.
All these forces make the driver feel as though their body is rotating around the vertical axis. Let’s recall that these forces stem from the compensatory forces we saw earlier (centripetal and centrifugal forces). In our simulator, we will see how this force can be emulated with the Yaw axis.